What can you practise on this Rubik's cube trainer?
Most cube sites hand you a scramble and a stopwatch. This page is the other way round: each section is one skill, and each one opens its own drill in the same trainer. Plan a cross in eight moves, insert F2L pairs, drill OLL and PLL cases, run a timed solve, or rebuild a superflip. Undo, reset and a fresh scramble are one tap away.
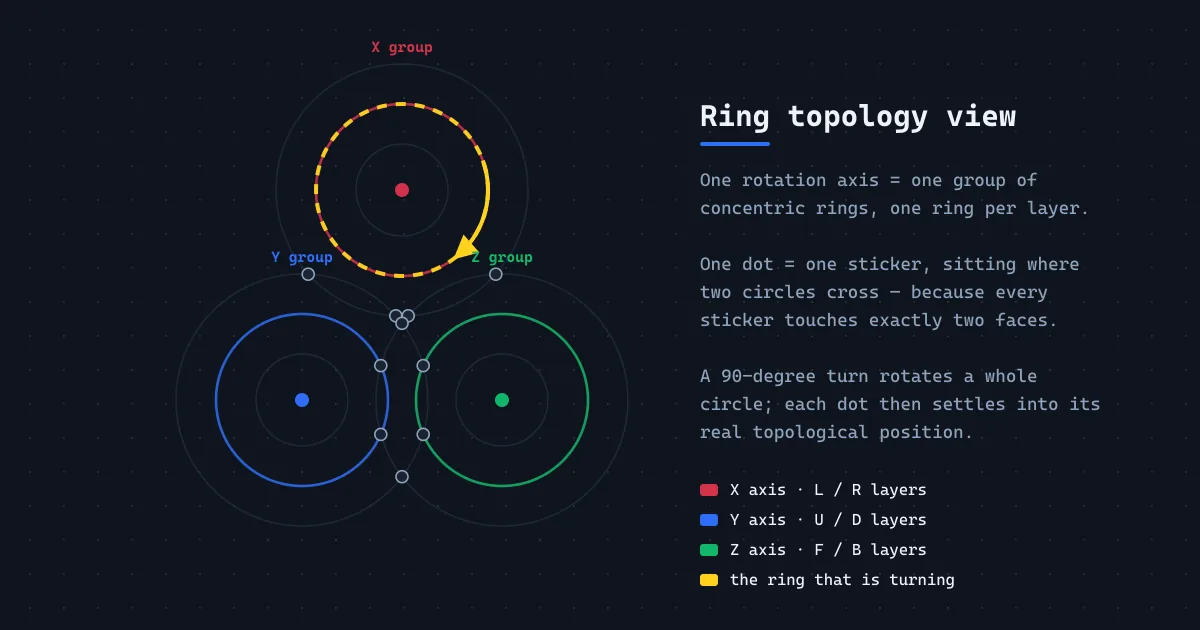
What no ordinary simulator has is the ring topology view beside the 3D cube. All 54 stickers map onto three interlocking rings — one per rotation axis — redrawn in real time on every turn. Colour is stripped away and only identity remains: you watch which pieces moved and where they went. That is the permutation underneath the puzzle, and it is why cubers finally understand an algorithm when they see it drawn as a cycle.
Records stay in your browser — no account, nothing uploaded.
Rubik's Cube learning methods
Two methods cover almost everyone who learns the cube online, and each shapes a different set of drills below. Neither is a full course here — the walkthrough has its own page.
Layer by layer method (beginner)
Solve the cube one horizontal slice at a time: cross, bottom corners, middle edges, then the last layer in two passes. Around 100 to 150 seconds once fluent, with almost no memorisation.
Best for: your first solve, and anyone building intuition for how pieces move.
The step-by-step version of this method: Beginner Rubik's cube tutorial
CFOP method (speedcubing)
CFOP is the competitive framework: Cross, F2L, OLL, PLL. Corners and edges are paired and inserted together, then the last layer is oriented and permuted with one algorithm each. Sub-20 lives here, and the four stages map onto the cards below.
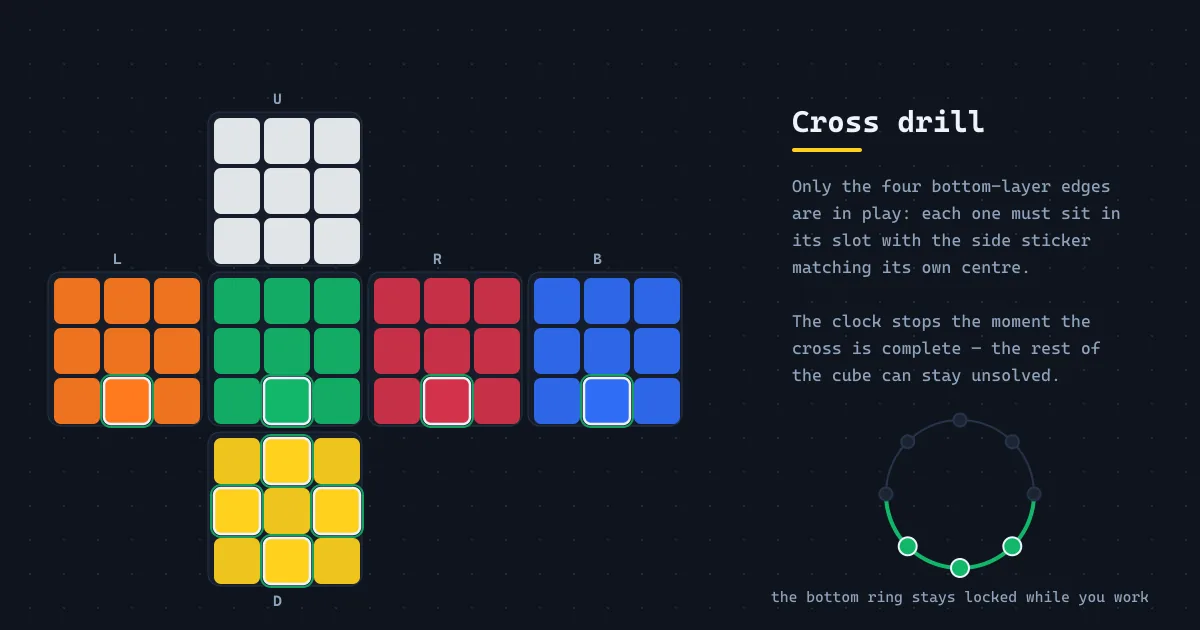
- Cross — four bottom edges, eight moves or fewer, planned in inspection.
- F2L — the first two layers as four corner-plus-edge pairs.
- OLL — orient the last layer; 57 cases, learned 2-look first.
- PLL — permute the last layer to finish; 21 cases, read as cycles.
Every algorithm below uses standard moves — the notation reference: Rubik's cube notation guide
Practice modes
Pick one stage. The drill scrambles into a position where only that stage is unfinished, and stops the clock the moment your target is met — not only when the cube is solved.
Interactive trainer — loads on this page
Choose any practice mode below and the 3D cube with its ring topology view opens here, with the clock, inspection timer and records for that drill.
Cross practice
The four bottom-layer edges are scattered; you want a cross whose side stickers also match their centres. The goal is checked on its own, so a half-finished cross costs nothing.
Best for: layer-by-layer cubers finishing the method, and CFOP cubers chasing a sub-8 cross.
The bottom-edge circles stay visibly locked, so a mis-placed edge reads as a swap, not a face that looks wrong.
F2L practice
The highest-return drill in speedcubing and the hardest to isolate on a physical cube. The target is cross plus four pairs plus the middle layer, counted as slots out of eight.
Best for: cubers between 40 and 90 seconds who still pair corners and edges separately.
Watching a pair travel around two rings shows why an insertion is one commutator, not two lucky moves.
OLL practice
Each drill is a real OLL case: a reference algorithm run backwards from a solved cube, so one algorithm orients the top face. The shape is read from the actual state, and revealed afterwards.
Best for: learning the OLL shapes before memorising all 57 cases.
Twisted corners and flipped edges look different on the rings — that is how you tell orientation from permutation.
PLL practice
Here the ring topology view earns its place. Each attempt hands you an oriented last layer — T-Perm, J-Perm, U-Perm a or b, H, Z, E or A — with only the permutation left.
Best for: moving from 2-look PLL to full recognition without a physical cube.
A corner three-cycle and an edge three-cycle are visibly different shapes, so PLL becomes reading a permutation.
Full solve timer mode
The complete workout: a 20-to-22 turn WCA-style scramble, optional inspection, and the clock running until the cube is solved. Results are stored per mode, so averages stay honest.
Best for: warming up before a competition and checking whether a change helped.
Replay a solve at quarter speed and follow one piece around the rings from first move to last.
Pattern challenge mode
A pattern challenge scrambles the cube into a known design — checkerboard, superflip with all twelve edges flipped in place, or four-spot — and you solve it back. Undoing a pattern teaches notation and symmetry.
Best for: teaching a friend and practising slice and wide moves.
Slice turns are hard to picture on a 3D cube and easy on a ring diagram: one circle moving.
How to use the ring topology view for learning
The ring topology view is a flat diagram of the cube you are turning. Each rotation axis gets a group of concentric rings, one per layer, and the three groups interlock in a triangle. Every sticker is one dot where two circles cross, because every sticker touches exactly two faces. Turn a layer and its dots travel along the circle, then settle.
Read it as a ring diagram rather than a picture of colours. A three-cycle is three dots chasing each other around one circle; two opposite edges swapped is two pairs trading places. Once you can name the cycle, the algorithm gets much cheaper to hold.
A two-minute way to read it
- 1
Follow one dot
Note which two circles a sticker sits on, then turn one layer. Only that dot moves — your unit of permutation.
- 2
Turn an algorithm you know
Run a Sune or a T-Perm slowly and watch the corner cycle and the edge cycle separately.
- 3
Predict before you turn
Stop mid-algorithm, guess where the dot lands next, then turn. Wrong guesses build lookahead.
- 4
Replay at quarter speed
Replay your last attempt and let the permutation unfold without your hands in the way.
Tips to improve your Rubik's cube solving speed
Boring habits do most of the work. These move a timesheet:
- Drill one stage at a time; a cross drill beats another full scramble.
- Plan the whole cross during inspection — eight moves matters more than speed.
- Slow down to stop: lookahead is worth more seconds than finger speed.
- Practise every algorithm both ways; a mirrored case is invisible to a one-sided speedcuber.
- Keep the cube on the table and your wrists still — body movement is lost time.
- Track Ao5, not your best single. One fast solve is noise, an average is a skill.
Frequently asked questions
Four questions people type when looking for a way to practise a Rubik's cube online.
What is the best way to practise Rubik's cube online?
Isolate one skill per session instead of solving the whole cube repeatedly: a cross drill with everything else solved, an F2L slot drill, or a single PLL case. Then measure something, ideally an Ao5 for that drill. An online trainer can check a partial goal and stop the clock there, which a physical cube cannot.
What is PLL in Rubik's cube?
PLL — permutation of the last layer — is the final CFOP stage: the top face is already one colour, and only the last-layer corners and edges must move into place. There are 21 cases, usually learned as seven 2-look algorithms first.
Can I learn Rubik's cube with visualization?
Yes, and it is often the missing piece. Algorithms memorised without seeing their effect produce cubers who can solve a cube but cannot debug one. The ring topology view draws every move as circles of moving dots, so a corner three-cycle or a double edge swap becomes a shape you can name.
How does the Rubik's cube ring topology diagram work?
Each rotation axis becomes a group of concentric circles, one per layer, and the three groups interlock in a triangle. A sticker is a dot where two circles cross, since every sticker touches two faces. Because the eight outer stickers of a face sit evenly on that circle, a 90-degree turn draws as a clean rotation of it. The diagram runs off the same move sequence as the 3D cube, frame by frame.
Keep going on CUBE·LAB
The simulator, the notation reference and a smaller cube are one click away.
3D Rubik's cube simulator
The full-page cube: free turning, automatic solve, ring view on a bigger canvas.
3D Rubik's cube simulatorRubik's cube notation guide
U D L R F B, primes, doubles, slices and wide moves — the symbols of notation.
Rubik's cube notation guide2×2 cube simulator
No edges, no cross, only corners — corner permutation alone.
2×2 cube simulator